 |
|

| Manual |
|||||
The Beginning • Overview • Getting Started HammerKit Tools • The Component Editor • Understanding Component Types Component Templates Creating Content Component Advanced Component Settings • The Style Manager • Working with Styles & Colors Creating a New Style Adding a New Color • The File Manager Folder Actions File Actions • The Keyword Manager • Settings Manager • Data Manager Creating & Using Data Entering Data Output Data Elements HammerKit Elements • Creating Content with Elements • Adding text • Adding Images • Cut, Copy & Paste User Manager • Defining Users, Groups & Access Rights • Adding groups • Removing Groups HammerScript • Syntax • Constructors & Variables Scopes |
Entering Data There are several ways to enter data into your database: Add it in the data manager - to add data in the data manager click the button on the button bar. This will add a row to your database. Double-click a field to add your data to it Creating a form to store data Forms are a good way to collect information from users of your web service. This quick example shows you a quick and easy way to create data collecting forms.
Creating the data table
Before we start to create a form, we need to define the table into which the data will be stored. open the Data Manager tool and click ʻ+ʼ in the Data Tables tray on the topleft. type the name for your table and click SAVE
Creating the form
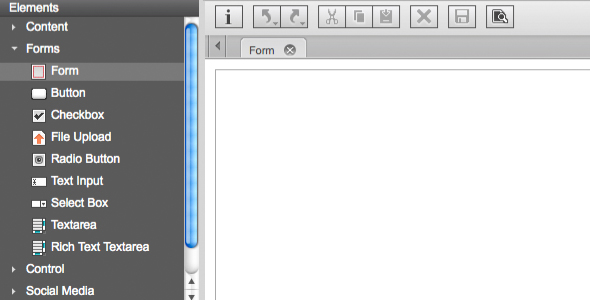
Drag the ʻFormʼ element from the element tray. This will display the Settings box for the form element, but there is no need to specify additional information for the form at this stage.
Next, drag content elements (e.g. table, text, image) and form elements (e.g. text input, select box, text area, rich text area, radio button, file upload, checkbox) from the element tray into the form. Arrange them to create your form as you would like it to appear. In this example we collect the usersʼ Name, Email, Password (+ a confirmation) and Favorite Color. When inserting the ʻText Inputʼ element, we define in the Settings: ʻNameʼ field the attribute for each piece of information by typing “form[“data object name”]. The ʻdata object nameʼ has to be the exact name you gave in the database. For example: for the Email field we type in form[Email], where Email is the data object attribute name defined in he data manager. For the button, add the ʻButtonʼ element and choose ʻSubmitʼ in the Type field. You can add text to the button by filling in the Value field. To store data from the form we need to add two things to the form settings: Open the form element Settings box and select the ʻAttributesʼ tab and next to the method attribute type ʻpostʼ This sets the form to send its inputs to an array that will be saved in the data table created above.
Save the data The final phase is to create a component to save the data and provide a message that the action completed successfully.
Create a new content component an call it ʻSave Example Formʼ Add an ʻObject Interfaceʼ element (under Data Handling) and select the Class as the name you provided for your data table from the drop-down list. Then set the Class method to ʻadd (static)ʼ and value to a ʻPost Variablesʼ called ʻformʼ. Click OK to save these settings. Finally add a text element with the words, “Data saved!!” and then save the component. Now you can test your input form. Open the example form you created, enter some data and hit the button you created. Your screen will change to the new component you created with the message “Data saved!!”. If you go to the Data Manager and open your table you will see your data in the table. |


Product
|
Company
|
Community
|
Awards
|
|||||||||||||||||||||||||||||||||||||||||||||||||||||||||||||||||||||||||||||||


