 |
|
| Manual |
|||||
The Beginning • Overview • Getting Started HammerKit Tools • The Component Editor • Understanding Component Types Component Templates Creating Content Component Advanced Component Settings • The Style Manager • Working with Styles & Colors Creating a New Style Adding a New Color • The File Manager Folder Actions File Actions • The Keyword Manager • Settings Manager • Data Manager Creating & Using Data Entering Data Output Data Elements HammerKit Elements • Creating Content with Elements • Adding text • Adding Images • Cut, Copy & Paste User Manager • Defining Users, Groups & Access Rights • Adding groups • Removing Groups HammerScript • Syntax • Constructors & Variables Scopes |
File Actions
click on the button bar. A popup will appear asking you to choose the file to upload click ʻChoose fileʼ and it will take you to the file manager on your computer. From here choose the file and it will return you to HammerKit. Now you can enter an alternative name for the file if you wish. click ʻUploadʼ and the file will be copied from your computer to HammerKit
Opening Files right-click on the folder to display the options menu. click ʻopenʼ and the file will be opened in a new window or tab
Editing Files right-click on the file to display the options menu. From here you can rename the file, or set its properties To rename it, click ʻRenameʼ. The name will now become editable. Choose your new name and press ʻReturnʼ to confirm it To change properties of the file, click ʻPropertiesʼ. This will enable you to add variables, set keywords and define access settings. You will also be able to see a log of changes made to the file. Click ʻSaveʼ to apply your changes to the folder settings.
Moving a File click and drag the file to the location you would like it to be moved to release the file and it will move to the new location
Deleting a File click to select the file you would like to delete. click the delete button in the button bar and you will be prompted to confirm the deletion click ʻOKʼ to delete the file
Setting Access Rights for Files and Folders
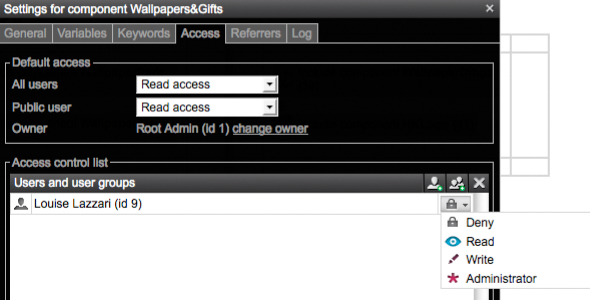
User-level access This defines what rights other registered users of your site have to the folder/file Write - this means the file can be seen and changed, for example, the name or properties of the file can be altered by users with this priviledge. They cannot delete the file. Administrator - this means the user has full control over the file, including the ability to delete it. You can set the access rights globally byclicking the default access buttons in the file manager canvas. You can also set specific access rights for a file or folder by: right-click on the file/folder to display the options menu. selectʻPropertiesʼ. click ʻAccessʼ Edit the default access settings at the top of the screen, or adding specific users or groups with defined access levels by clicking the buttons. This will prompt you to choose a user or group and then set their specific access priviledges. When you set access priviledges for a file they will be reflected in the Users and Groups Manager when you check the access settings for a user or group. |
Product
|
Company
|
Community
|
Awards
|
|||||||||||||||||||||||||||||||||||||||||||||||||||||||||||||||||||||||||||||||


